 |
|
Abstract
Google announced that replacement from UA (Universal Analytics) to GA4 in 2023-July-1*1. It also means currently popular analysis manner based on session is also replaced to
- user based analysis
- event based analysis
Today, a single user uses variety of devices from PC to smartphone. Google may believe that making such a major change in access analysis is a necessary to make web better in the long run.
Or it may be thought of this way. Session based data aggregation and statics are no longer important to Google; they need user based data aggregation and statistics. So, they developed GA4 to collect such information. They let users use it and get the information at last.
In any case, I need data aggregation and analysis especially focusing "today" as
- What sites linked to my blog posts today
- What sites accessed to my blog post today
- What blog posts are getting traffic today
Although GA4 is meaningful for aggregation and analysis on a monthly or annual basis, it is not suited for especially focusing "today". It is no exaggeration to say that is is not possible.
Actually, reports created for "yesterday" data*2 is not available at 7AM next morning. Probably data in Google is not prepared yet.
Then, I tried umami*3. This is very comfortable to use and fit-for-purpose analytics tool especially for
friendlier, privacy-focused alternative to Google Analytics
Umami collects only the metrics you care about and everything fits on a single page
This post introduces steps to host it on Heroku.
Assumption
This post is based on "Running on Heroku"*4, the official install document with some modifications. Some works and order are different from the original.
Originally, "Deploy to Heroku" on the install document should work. Since it did not work, this post explains the process of manual install. Try "Deploy to Heroku" first and did not work, then try the steps in this post.

The procedure described here assumes that the following environment is in place. But this post does not explain them.
Steps


Heroku - PostgresSQL
Database
Create database for umami with "Heroku Postgres". Select "Hobby Dev - Free" as "Plan name".
Overview > Configure Add-ons
 |
 |
 |
Attached as DATA BASE > This app as DATA BASE
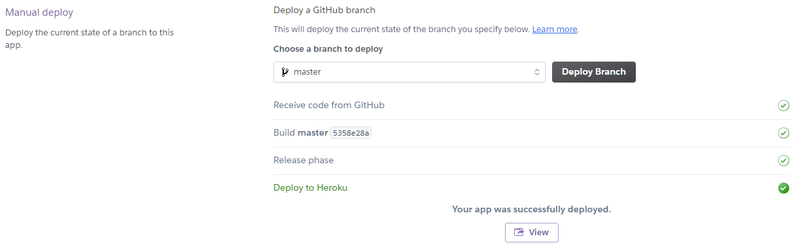
Then, back to the point previously stopped, and deploy umami.
Manual deploy > Deploy Branch
Tables
This is command operation with Heroku CLI. Run SQL script to create tables through CUI as PowerShell or Terminal.
This is the template of command.
heroku run psql -h [Host] -d [Database] -U [User] -f [File] -a [App Name]
Need to replace parameters defined with [] to appropriate values. They are listed at "Database Credentials".
Settings > Database Credentials

Items of Credentials, options in command, and parameters are corresponding as
| Credentials | option | parameter |
|---|---|---|
| Host | -h | value at Host |
| Database | -d | value at Database |
| User | -U | value at User |
"Database Credentials" doesn't provide both "File" and "App Name". Next value should be set at "File". And the name set at "Heroku - new app" should be set at "App Name". Although "espio999-umami" is set as "App Name" in this post, it is vary from each cases.
| option | parameter | |
|---|---|---|
| File | -f | sql/schema.postgresql.sql |
| App Name | -a | value set at "Heroku - new app" |
Then, run command, password is asked. This is the value at "Password" in Credentials, not one for Heroku account. Don't misunderstand.

umami - registration of monitored site
Finally, umami works. Run umami with "Open app".

Input next account and password at initial login. They can by changed after login, and they should be.
|  |
Select "Add website" to register monitored web site.
 |
 |
Then, get tracking code (script tag for monitoring) at "Go to settings".
 |
 |
Tracking code should be inserted at appropriate point in monitored web site. umami starts monitoring access after tracking code injection.
|
 |
 |
umami database
umami database consists of 5 tables below.
| account | umami user account | master table |
| event | event definition | master table |
| pageview | pageview records | data table |
| session | session records | data table |
| website | monitored site | master table |
umami/schema.postgresql.sql at master · umami-software/umami · GitHub
As monitored sites are accessed, record is inserted to both pageview and session table.
Deletion of DB records
Max records (rows) of hobby-dev database on Heroku is limited to 10000. And approaching row limit, warning is mailed. To run umami under free resource limit, unnecessary records should be deleted before reaching limit.
The records to be deleted are those in table of both pageview and session. Example, to keep last 7 days records and delete older one, run next SQL.
delete from pageview where created_at < now() - interval '7 days';
delete from session where created_at < now() - interval '7 days';
As well as "Tables", it can be run as file, or directly execute it on Heroku console. To execute on Heroku console, login without "-f" as following. Type and execute above SQL after login.
heroku run psql -h [Host] -d [Database] -U [User] -a [App Name]